Natalie's Lentil Bolognese

One of the most disappointing moments of not really being a meat eater (I say ‘not really’, as I still cook and taste meat as part of my work and love of cooking), for me, is when a big bowl of Spaghetti Bolognese is put on the table.

The hearty sauce filled bubbling away on the stove for hours on end only to result in me eating either plain pasta with Parmesan, or some left overs, never feels satisfying.

Enter my Lentil Bolognese.

It’s vegan, but just as hearty and delicious as the original, meaty version. The ingredients are mostly the same as the original so it’s easy to do a big cook up of both in tandem if you have a family with varying dietary preferences like mine. And, topped with plenty of parmesan cheese, I’m never left feeling like I missed out.


Natalie’s Lentil Bolognese
Makes 6-8 generous serves.

Ingredients
- 2 Onions, diced
- Olive Oil
- 3 carrots, diced
- 15 or so button mushrooms, sliced
- 2 cloves of garlic, crushed
- 3 heaped tablespoons tomato paste
- 2 cans of cooked brown lentils, rinsed and drained. You can also use dried red lentils if you prefer, or a mix.
- 3 400gm tins of finely chopped tomatoes (I used Mutti Polpa, here).
- Fresh or dried oregano, or fresh basil (or both)
- 3-4 large bay leaves

Method

1. Place the onions, carrots and a generous glug of olive oil into a large saucepan. Cook on a medium heat until the onions are translucent.

2. Add the mushrooms and cook for a further 2-3 minutes, or until they start to soften.

3. Add the garlic and stir through for 30 seconds or so, before adding the tomato paste. Stir until it’s coating most of the ingredients.

4. Add the lentils, herbs and bay leaves, then the canned tomatoes. Also add two tomato cans filled with water to the pot before bringing up to a boil.

5. Once boiling, reduce to a simmer and with the lid resting just off to the side on top (allow steam out but hopefully stop splatters), cook for 1.5-2 hours, keeping an eye on it to make sure the liquid doesn’t reduce too much (just add a little more water if it starts to dry out but keep in mind your serving time - you don’t want watery bolognese in the end!).

6. Before serving, remove the bay leaves and season well with salt and pepper. If you have any fresh basil or oregano, a little added at the end is also delicious.

7. Serve on your favourite pasta and top with plenty of parmesan cheese. If you’re vegan, or have vegan guests, nutritional yeast is a delicious alternative.

Enjoy!


There would be easier ways to show you my Lentil Bolognese, but this seemed much more fun.

I love to batch freeze this bolognese into individual portions I can whip out when the rest of my family is having the meaty version. If you are going to freeze some, make sure you leave a little more liquid in it to allow it not to dry out when you cook it again out of the freezer (alternatively add some water before reheating in the pot).

I hope this gets more hearty pastas onto vegetarian tables this Winter.

Nat x

Vegetable Quiche

With very little time and very few groceries for dinner late last week, I pulled out the almost-unusable bag of fresh spinach that had been forgotten in the bottom of my fridge, the one red onion I’d been saving for a paella I never got around to making and the sweet potato hiding behind it and came up with this little quiche (which I would say was surprisingly tasty, but it contains everyone’s beloved Meredith Goats Cheese, so it’s not really a surprise that it was delicious at all.

In true my-son-now-goes-to-kinder mode, I don’t have much time to write this recipe before picking him up either, so I best get to it.


Vegetable Quiche

Ingredients
- 2 Sheets puff pastry
- 1 large roast potato, diced and roasted
- 1 red onion, diced
- 2  handfuls of fresh spinach, roughly chopped (cook with onion)
- 4 eggs, whisked
- 1/3 of a cup of full cream milk
- 4 cubes Meredith feta, broken into smaller pieces.
- salt & pepper to taste

Method

1. Line a 25cm Quiche tin with removable base with the thawed puff pastry. Cover with baking paper (and the edges with foil to avoid overcooking later, if you like), fill with pie weights or dried beans and blind bake for 20-30 minutes or until the base starts to cook.

2. In a small frying pan, cook the onion until translucent, then add the spinach and cook until wilted. Allow to cook completely.

3. In a large bowl, combine the onion and spinach mix, roasted sweet potato, eggs, milk and feta. Season with salt and pepper and pour into the cooled pastry crust.

4. Bake at 160c for 25-30 minutes or until the centre of the quiche has set. Allow to cool completely (or overnight in the fridge) before serving.

Makes a beautiful made-the-day-before dinner, too!


Nat x

Pumpkin, Lentil & Cabbage Soup

Years and years ago, flicking through an old magazine at Mum and Dad’s (which I can’t imagine finding now as my parents don’t really read magazines), I remember seeing fenugreek powder and fennel seeds in a soup recipe with pumpkin and lentils. At the time having received fenugreek powder as a part of a gift in a kind of food hamper, I was excited to discover a way I could use it. I was probably about 22, still working an office job and hadn’t yet realised how important food would be in my life.

Although this recipe doesn’t contain fenugreek powder as it’s much harder to come by than fennel seeds (which are readily available in supermarkets), I’ve been making what I think is a version of this soup ever since.

Pumpkin, Lentil & Cabbage Soup - Natalie Zee


With only eight ingredients, most of which I usually have at home anyway, and perfect for freezing, this has become a favourite soup of mine over the years (alongside my beloved Minestrone and Carrot & Potato Soup). It’s not Alexander’s favourite so I often make it to freeze in batches, pulling it out when the boys are eating meat. (For those new here, I do not eat meat but I do cook it for them).


Pumpkin, Lentil & Cabbage Soup

(with Fennel)

Ingredients
- 1/2 a small cabbage, roughly shredded
- 1kg of diced pumpkin
- 3 tsp of fennel seeds, ground into a rough powder (I use a mortar and pestle)
- 1 large leek, washed, halved and sliced
- 1 and a 1/2 cups of green/brown lentils, rinsed
- 2 cups of vegetable stock (chicken would also work)
- 2 tbsp of butter
- 2 tbsp of olive oil

Method
1. In a large saucepan, cook the leek in butter and oil until it begins to caramelise.

2. Add the fennel seeds and cabbage. Cook, stirring until the cabbage is well wilted (3-5 minutes, for me).

3. Add the pumpkin, lentils, stock and enough water to cover. Bring to the boil then reduce to a simmer>

4. Once the pumpkin is cooked and the lentils are just tender, season with salt and serve immediately.

Pumpkin, Lentil & Cabbage Soup - Natalie Zee


It’s delicious served with fresh crusty bread, but I really would say that of almost any soup.

Pumpkin, Lentil & Cabbage Soup Recipe Card for Pinterest - Natalie Zee

Pumpkin, Lentil & Cabbage Soup- Natalie Zee


You could make it a vegan soup by omitting the butter or using vegan butter, but the butter really does add a delicious flavour to the leeks so unless you’re vegan I would encourage you to use it (adding more wouldn’t hurt, either!).

Let me know if you try it and, well, happy Winter!

Nat xx

Mum's Ricotta & Pea Pasta

A lot of what I cook is heavily influenced (or a direct copy of…) something my Mum or Nunna cooked for me growing up. This delicious, simple pasta which I almost always have all of the ingredients for is one of those recipes and I make it at least once a month, especially now I have Alexander who absolutely loves it (and it works really well as a side with some penne or spirals for his little pasta-loving belly).

It does contain eggs but if eggs can’t be on the menu at your house for any reason, 'I’d add a littlestock or even cream to the ricotta to loosen it up and a whole lot more pasta water when mixing it through the pasta as an egg-free alternative.

If you can’t go a day without meat, some cooked bacon or prosciutto would work well on top, too.

Ricotta & Pea Pasta - Natalie Zee

Mum would make this often when I lived at home (which was over 12 years ago now! Crazy…). It was a kind of go-to when nothing was planned for dinner - ’I’ll just make ricotta pasta’. Now it serves as the kind of two-minute-noodles of my life, even though my hubby still likes actual two minute noodles occasionally (I can take them or leave them, I’ve never understood the fuss!).

It’s quite a heavy pasta dish which is why I don’t use as much spaghetti as I usually do, but feel free to use more.

RICOTTA & PEA PASTA
Serves 2

Ingredients;
- 120g of spaghetti (or your favourite pasta)
- 1/3 of a cup of frozen peas
- 1/3 of a cup of ricotta
- 1/3 of a cup of grated parmesan cheese
- 1 egg, lightly whisked
- Black pepper, to taste.

Method;
1. Cook the pasta with the peas in well salted water as per packet instructions.

2. Meanwhile, mix together the egg, ricotta and parmesan with a generous amount of black pepper (the pepper is optional but particularly delicious in this dish).

3. Drain the pasta, reserving at least half a cup of the cooking water.

4. Return the pasta to the pot and stir the ricotta mixture through with a splash of pasta water. Add more pasta water if needed.

5. Serve immediately topped with extra black pepper.

Maybe this isn’t my two minute noodles, maybe it’s more my mac’n’cheese, though I do still make mac’n’cheese I have to say,

Next time you have ricotta you’re not sure what to do with, give it a go! Super delicious and much quicker than one of my favourite things ever to do with ricotta - make gnocchi (and my almost-3-year-old loves it so hopefully your kids will to!).

Nat x

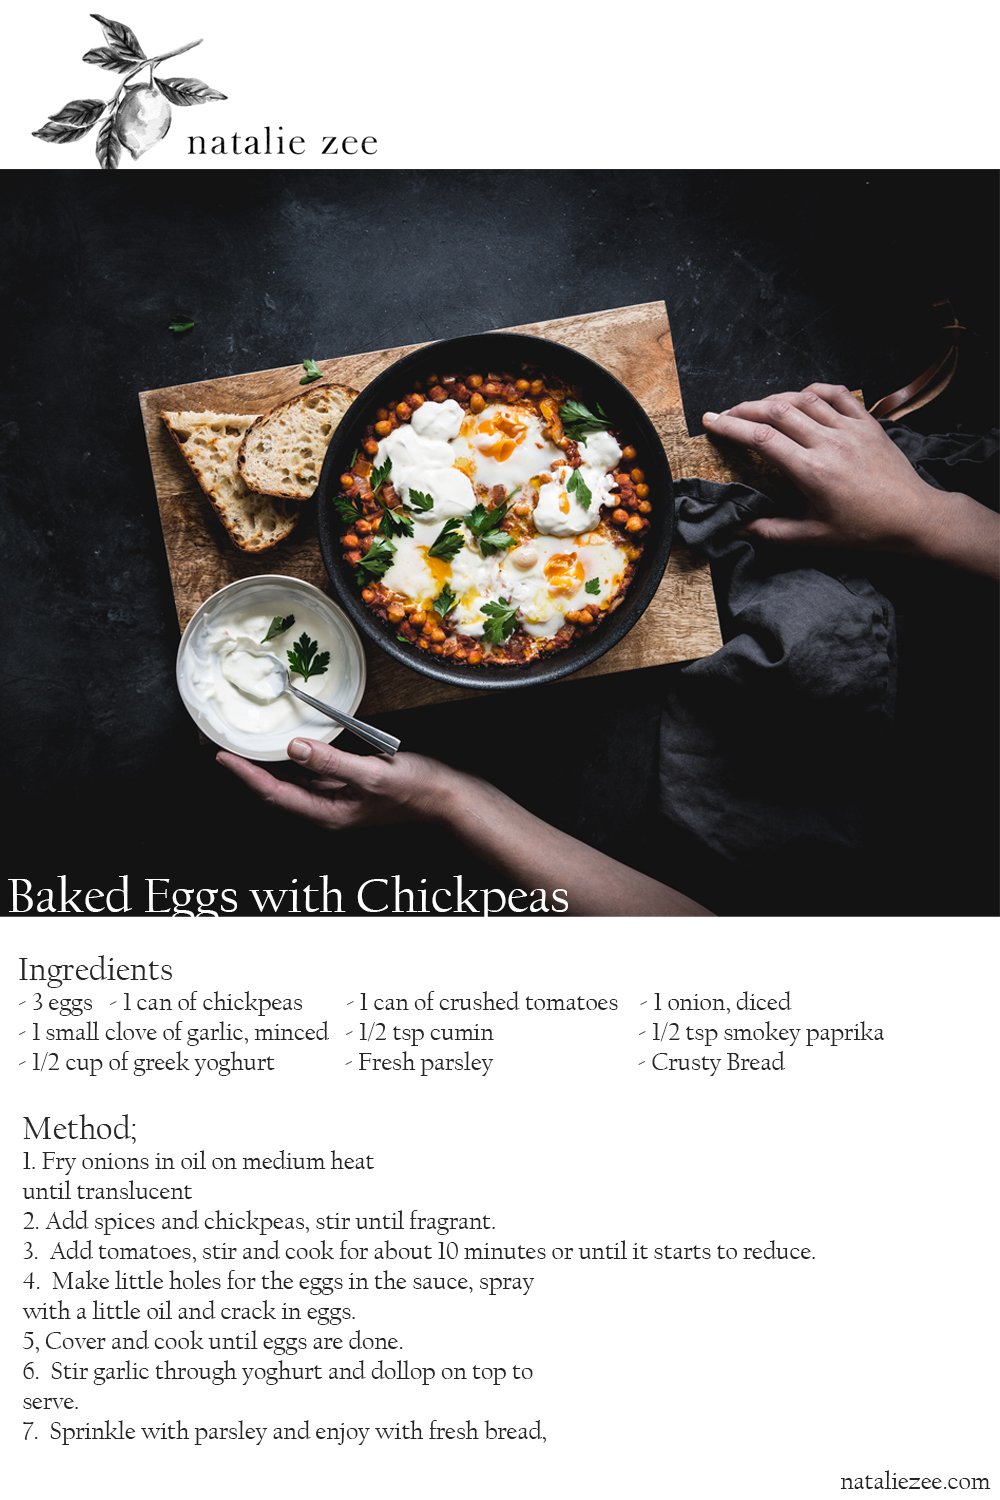
Baked Eggs with Chickpeas

To continue my slow return to ‘Healthy not Hard’ recipes (that is, recipes I’ve previously refrained from sharing as I feared they’re so simple no one would be interested in them), I’m sharing this very simple baked eggs dish.


This is something I make regularly for any meal of the day. This is the basic recipe, but you can add extra veg (grated zucchini or left over roast sweet potato is a favourite of mine, but so many veggies work here) to the sauce to make it even more nutritious and delicious. Although it only takes about 15 minutes from start to finish to make, I do sometimes make a veggie-packed version of the sauce for the freezer to whip out on busy nights, popping it in the pan to cook and adding the eggs just before serving whenever something (usually around 3 years old) needs me more than I need to make a more complex meal.

The garlic yoghurt is delicious, but can be replaced by feta (or cashew cheese to keep it dairy free). If you don’t like eggs it’s also delicious with some seafood popped on the top - salmon, prawns or white fish would be my pick, and add some lemon if you go down that route.

Scroll to the bottom to find the recipe card which you’ll also find in my newsletter (sign up here), or you can screenshot below. They’re also great for pinning to Pinterest (which I’ve returned to as well).

BAKED EGGS WITH CHICKPEAS
Serves - 2-3 / Prep time - 5 minutes / Cooking time - 10 minutes

Ingredients
- 3 eggs
- 1 can of chopped or crushed tomatoes
- 1 can of chickpeas, drained
- 1 onion, diced
- 1/2 a tsp of cumin powder
- 1/2 a tsp of smokey paprika
- 1/2 a cup of Greek yoghurt
- 1 small clove of garlic, minced
- Parsley and fresh crusty bread, to serve.

Method
1.
In a medium-sized fry pan, fry the onion in a little olive oil over medium heat until translucent.

2. Add the spices and chickpeas, stirring until fragrant (about a minute)

3. Add the canned tomatoes with a splash of water and cook for 5-10 minutes on a low heat, or until it starts to reduce and deepens in colour.

4. Make 3 small wells in the chickpea mixture, pour in a little olive oil and crack one egg into each.

5. Cook on a medium heat, covered, for 3-4 minutes or until the eggs are cooked to your liking.

6. Meanwhile mix the garlic with the yoghurt and season to taste.

7. Once the eggs are cooked, dollop the garlic yoghurt on top, sprinkle over some fresh parsley and serve with crusty bread.


Enjoy!

'

And here’s the recipe card I was talking about which I hope you like (i’d love to hear your thoughts on this and whether you find it useful / if you use Pinterest!).

I can’t tell you how much fun it was to create and capture this. I’m not posting often, but I so love it when I create and share something with you. I love cooking super simply, I always have, and I know that prior to having Alexander when I was working to win as many jobs as I could, that I veered off the path of what I truly love onto the path of what I-thought-everyone-else-would-love.

It’s good to be home and share Healthy, not Hard with you again.

Thank you for reading and for your beautiful support,
Nat x

My Favourite Roll (Egg Mash, Pickle & Swiss Cheese)

I did promise I’d be making simple recipes, and this is about as simple as it gets…


My love for this combination started during my pregnancy when, after the first 22 weeks passed and I could return to eating something that wasn’t pasta with peas and butter or plain pasta or ravioli (morning sickness was intense over here!), I was craving a baguette I’d had in the city a few times.

I couldn’t remember exactly what was in it beyond eggs, pickles and Swiss cheese - the Swiss cheese was firmest in my memory as before pregnancy I absolutely despised Swiss cheese in any form from anywhere. Suddenly, as pregnancy goes, I HAD to have as much Swiss cheese as possible. And I wanted it with mayonnaise.

Enter my new almost-daily pregnancy lunch, as still regularly enjoyed lunch to this day - my Egg, Pickle and Swiss Cheese Roll.

Egg, Pickle & Swiss Cheese Roll.


It’s a very simple combination but incredibly delicious (trust me). It doesn’t really warrant a true written recipe, but here are the key elements;

- Crusty but soft bread (I like a french stick or baguette best and find sourdough too strong for it).
- 1 tbsp of Kewpie Mayonnaise to every 1 hard boiled egg. I use one egg per person and season with salt.
- Sweet Sandwich Pickles (I use ‘Sandwich Stackers’ from the supermarket - it doesn’t taste the same with the lower-sugar pickles)
- Good quality Swiss Cheese (I use Jarlsberg and love to buy the slices, even through they’re infinitely more expensive, I find something strangely luxurious about pre-sliced cheese).
- Lashings of good quality, unsalted butter (I’ve been using Mainland Buttersoft spreadable butter for years, but any good butter will do the trick - just don’t be shy with it, it’s important here!).


How you layer it is really your business, but I go butter-egg-pickles-cheese. I’m always hesitant to recommend how to layer a sandwich/roll/burger as my hubby worked at McDonald’s as a first job and used to correct me on how I layered things when we first started living together over a decade ago. But I do find the butter stops the egg soaking into the bread if you do happen to be packing it up for a picnic, and the cheese stops the pickles on top. So it works for me.

I can’t offer a variation on this sandwich as I believe this is perfect as it is. But if egg, pickles or kewpie aren’t your thing, maybe it’s not the recipe for you.


However if Swiss Cheese isn’t your thing, I’d still encourage you to give it a go. Especially if you’re pregnant…

Nat x

Simple Toasted Muesli

I never actually make the same muesli twice - heading out to the shops to buy walnuts when I already have peanuts I need to use, or buying more Medjool dates when I have a few left in the fridge because I needed more according to the recipe is not my thing. I like to make use of what I have and I hate buying groceries most than once or twice a week.

So how do I make my toasted muesli?

Well after making different variations for years and years, I’ve, without even realising, developed my own little formula, and it goes a little something like;

- 3 cups of oats
- 1 cup of chopped nuts
- 1/2 a cup of dried fruit
- Flavourings (like cinnamon, maple syrup or orange rind)
- 1/3 of a cup of oil
- 1/2 a cup of sweetener (like honey or maple syrup)

And then bake (my exact recipe for the muesli pictured is below).

This method does mean my fruit is chewier than most toasted mueslis as it dries out a little, but not only do I like it like that, but I prefer to bung (what a word!) everything together so I can clean up while things are cooking. Adding different things at different stages is too high maintenance for me. (Perhaps I should change ‘Healthy Not Hard’ to ‘Tasty and Lazy’!).


While I am about to share the exact recipe I used here, I want to encourage you to use what’s in your pantry. Oats are kind of needed, for sure, but any nuts you have (PSA - Peanuts in muesli or granola are THE BEST) - use them! Dried fruit (Apricots, dates, sultanas, even prunes), get it out and chop it up all together (and if you’ve got none skipping the fruit is fine!). My only tip is if you do want to add seeds like flaxseeds or LSA, add them for the last 5 minutes of baking - I don’t think they fair well baking for a long time.

If you use the above ratios, you can’t go wrong.

But here’s what I did on this day….

Ingredients;
- 3 cups of rolled oats
- 1 cup of roughly nuts (I used a combination of walnuts, peanuts and almonds)
- 1/2 a cup of sultanas
- 1/3 of a cup of olive oil
- 1/2 a cup of honey (heated a little so it was easy to stir through)
- Rind of 1 orange
- 1 tbsp of cinnamon

Method;
1. Preheat your oven to 180c and line a baking tray.

2. Combine all of the dry ingredients in a large bowl.

3. Pour in the oil and honey and mix until the muesli mixture is well coated.

4. Spread flat onto a tray and bake for 20 minutes or until golden and toasty, stirring every 5 minutes and being sure not to leave alone for too long (it can get too golden very quickly).

5. Remove from the oven, give it a final stir and allow it to cook on the tray.

Super simple, super delicious (I often find myself eating it out of the canister as a snack).

After a few times making this the quantities will be in your brain forever and you’ll never have to wonder which toasted muesli recipe to make again.

Nat x

Carrot & Potato Soup

I was originally saving this soup recipe for the cooler weather but hey, it’s Autumn in Melbourne now and seeing as I love soup in any weather anyway, I’ve decided to share it (especially as I’ve been doing some planning and don’t have a whole lot of new recipes ready to go).

The best thing about this soup, for me, is that I almost always have all of the ingredients in the house. The fresh coriander on top is delicious, but it can be left out (chilli flakes or sauce is also yummy), and if you don’t keep fresh ginger in the house that might change if, like me, you learn that keeping a knob in the freezer and just grated off what you need on a micro-plane (skin and all, it’s fine!) is an option.

(….. I found learning I could freeze ginger life changing but at the risk of this freezing ginger business actually being news to no one, I’ll play down just how excited I was learning this a few years ago).

CARROT & POTATO SOUP

Ingredients;
- 3 medium sized potatoes, peeled and roughly chopped
- 6 large (or 8 small) carrots, peeled and sliced into thick disks
- 1 tbsp of fresh ginger, grated
- 2-3 cloves of garlic, roughly chopped
- A bunch of fresh coriander, stems removed and roughly chopped (if you’re a coriander hater, you can leave it out, but it really is so delicious with it!)
- 2 tbsp of cumin powder
- 3 cups of vegetable stock (chicken stock also works well, as does water if you have no stock – you’ll just want extra seasoning at the end).
- 2 tbsp of olive oil
- Greek yoghurt or sour cream, to serve

Method;
1.  In a medium saucepan, add the olive oil, garlic, ginger and coriander stems and cook on a medium heat until fragrant.

2.  Add the cumin powder, carrots and potatoes and stir for 30 seconds to coat.

3.  Add all of the stock and bring to the boil.

4  Simmer for 15-20 minutes, or until the carrots and potatoes are tender (a skewer should go through both with no resistance).

5.  Turn off the heat and allow to cool for a few minutes before blending. 

6.  Season to taste and serve with Greek yoghurt or sour cream, and fresh coriander leaves on top.


How I serve this to my 2yo;

He used to love soup and when he did, I used to add some red lentils to this recipe (with some extra stock) for protein and serve it with buttery toast soldiers. Red lentils are a great addition anyway for a more filling soup for everyone.


Now that soup is no longer and acceptable meal, I pull out some of the carrot and potato before blending, chop it up and serve it with butter toast and a protein (usually a boiled egg) and a little of the soup as ‘sauce’.  I always pop some fresh coriander, usually a long stem, on the plate too – he occasionally picks it up for a bite, but rarely twice in the same sitting.


PS. It freezes really well so I love to make this one as a part of a batch cook on a weekend (also a great soup to batch cook for someone in need and, without the yoghurt on top, it’s gluten free and vegan).

Nat x

Eggless Pancakes

One of Alexander’s beautiful little friends L, who he’s known since birth (L’s Mama is a close friend of mine), has an egg allergy.

As Alexander eats pancakes almost every morning (wholemeal with fruit and spinach in them, drizzled with honey and served with a dollop of yoghurt while I sit next to him eating the end of the bread or left overs, as is the life of a mama…), I set about creating a simple pancake recipe for L that doesn’t use eggs which I’d never done (I’ve never had the need!).

After doing a little reading on making eggless pancakes and then a little testing (to make sure my quantities not only tasted good but looked, smelled and bubbled-before-you-turn-them-over, just like real pancakes, so little L could learn when to flip them one day, too), I settled on the below…

A classic pancake recipe and one very similar to what I make Alexander every morning with fruit and spinach, but no sugar…

Eggless Pancakes - Natalie Zee

Classic Eggless Pancakes for our friend L

Ingredients
- 1 cup of Self Raising Flour of choice
- 1 cup of Milk (use plant based for a vegan pancake)
- 1/2 a tsp of baking powder
- 1 tsp of vanilla essence (optional)
- 1/4 of a cup of caster sugar (optional but delicious!)
- 2 tsp of White Vinegar

Method
1. Add all of the dry ingredients to a medium sized bowl and mix well.

2. In a separate small bowl, mix the vanilla and vinegar.

3. Make a well in the middle of the dry ingredients and at the vanilla and vinegar mixture as well as the milk. Stir well immediately.

4. Dollop large spoonfuls into a greased pan (I use butter) and cook until bubbles appear on top before flipping over.

To make Eggless Banana and and Spinach pancakes, omit the sugar and add one mashed banana (or mashed/grated fruit of your choice), and 1-2 frozen spinach cubes, defrosted. If you use a more watery fruit, such as pear or cooked apple, you can add an extra tablespoon or two of flour to thicken the batter a little.

Serve either as you would your favourite pancakes.

Let me know if you try them! Also let me know if you’d like to see me try more usually-eggy, eggless recipes.

Nat x

GRAPEFRUIT & ORANGE SALAD

Disclaimer - this is NOT my recipe!

This beautiful, amazing, delicious salad is very much inspired by (/an idea totally copied from) a beautiful cafe I absolutely love in Seddon (in Melbourne’s inner west) that I have missed frequenting SO much over the past 2 years of lockdown/travel limits/having a child who was for a large part of that time not really into sitting still long enough for me to enjoy it.


That cafe is Common Galaxia.

(at the time of writing this their web site was down so I’ve linked to Mr Yum to view their menu and order online).

This cafe, pre-little-man, was my go-to for people coming to Melbourne that I’ve known forever online and wanted to share a meal with, and this was my go-to dish. Now, this interpretation is delicious but does not match the sweet ruby grapefruit CG always seem to have, the beautiful sourdough they always serve alongside and their perfectly poached eggs I always add on top. If you can get there to try the real thing, I recommend that.


If you can’t, here’s the little salad I’ve been making to fill the gap…


INGREDIENTS


- 2 Oranges, peeled, pith removed and roughly cubed
- 1 Grapefruit peeled, pith removed and roughly cubed (juice from waste reserved)
- 1 large bunch of rocket, washed
- 6-8 radishes (depending on size and how much you like them!)
- 1/2 a small red onion, finely sliced
- 2 small avocados peeled, seed removed and roughly cubed
- 1 large handful of almonds, toasted and roughly chopped
- 2-3 cubes of marinated feta + oil for dressing


METHOD


1. Toss the red onion with the reserved grapefruit juices and set aside.

2. Spread the rocket on a large plate and top with oranges, grapefruit, radishes, onion and avocado.

3. Top with almonds and break apart the feta and sprinkle on top.

4. Finally, dress with marinated feta oil (or olive oil, salt, pepper and a little lemon juice).

SO delicious.

At home, I’ve been serving this alongside pieces of salmon with plenty of lemon over everything when we’re tired of pasta but still want something delicious on the weekend. It goes beautiful as Common Galaxia serve it for breakfast with poached eggs and thick toasted sour dough. It’ll be a lovely addition to our BBQs (alongside the Ottolenghi salad I make on repeat and everyone requests) when the weather is warm and it’s safe to have people over again and honestly, it’s just delicious alone.

It’s just yum.

Let me know if you give it a try!

Nat x


GREEN SOUP

Prior to working under my own name, I used to go by ‘Healthy Natty’. I say it like it was 100 years ago but I think it was actually, oh, two?

I changed the name not only because I wanted to be taken more seriously as a photographer and not so much a blogger/influencer (I have no problem with these things, and I am guessing you can be both, now), but also because I hated the connotation of the word ‘Healthy’. I’d started sending back recipes ideas that contained sugar or butter for quotes and, occasionally, get replies along the lines of, ‘Oh, I thought you were ‘Healthy’ ?.

Healthy, to me, has always been as simple as listening to your body.

When my body says, ‘Eat loads of pasta with lashings of parmesan and a big glass of delicious red wine’, I never say no.

When, on a day I planned to do some exercise, my body feels tired and it’s extra difficult to get out of bed, I never ignore it. I would never, on that day, force myself out of bed and into the cold for a run.

And when my body says ‘I think I’d like some green veggies now’, I almost always make a version of this…

GREEN SOUP

Ingredients

- 2 x heads of broccoli, roughly chopped
- 1 small bag of frozen peas
- 1 small bag of spinach
- 2 zucchinis, roughly chopped
- 5 cloves of garlic, peeled and roughly chopped
- 1-2 tsps of ground cumin
- 1-2 cups of stock (I used vegetable).
- Greek yoghurt or sour cream, fresh herbs, croutons and salt and pepper to serve

Method

Add all of the ingredients, except the yoghurt, to a pot and boil, lid on adding a little water if needed - but not too much as to not make the soup too watery. Sometimes I do this by accident and scoop a little water out before blending it up, but if you keep the pot on and stir regularly the top veggies will steam as the others boil.

Blend it up, season and serve with yoghurt, cream, fresh herbs or as I have here, crumbled mini-toasts in the absence of croutons (I love using left over mini toasts or crackers for this as to not waste them).

Variations
- Fresh herbs like basil, parsley and mint are delicious. I don’t add cumin when using fresh herbs (and with basil a few black olives thrown in is super tasty).
- If you have asparagus, green beans, frozen green veg or even lettuce - throw it in. This is the best soup for those vegetables from 3 weeks ago when you swore you’d eat more green veg… cauli works well, too.
- Parmesan, chilli or lemon (or combined!) stirred through at the end is delicious!


I hope, on those ‘I need more veggies’ days, you find this as nourishing as I do.


And before I leave I want to mention that listening to my body, to me, is not just about the physical but SO much about the mental and emotional. Not just where food is concerned (I truly believe a big bowl of pasta helps both my mental and emotional health, too), but, especially since becoming a Mum and through this insane pandemic, I’ve found it really important to stop listening to what everyone else thinks I should be doing for my health (Face masks! Exercise gently! Read more! Yoga!), and look inside myself for what I need.

Sometimes, what I need, is help figuring what I need out, and that’s OK. But I no longer find it OK to be told, by anyone, what it is I need for my own health.

Does that make sense?

I hope so.

Nat x

PB SWIRL BROWNIES (for my toddler...)

I’m back! I’m writing a blog… which I haven’t done in years. I’m not making a big deal of it (or did I just then?) and deciding to return with just a really simple recipe, which honestly was me winging it wanting to make a version of a brownie that would not end up in the beautiful, expensive, mostly white (yup) pure wool rug in our lounge room obviously bought years before having our son.

Regrets in life? None. Obviously.

Winging as a mother? Never!

Anyway! These brownies are, as previously mentioned on Instagram, not really brownies. They’re more like a dense, non-crumbly, non-gooey cake that isn’t overly sweet and is way too filling for a brownie. Despite this incredibly enticing description (?), there were requests for this recipe to be shared so here it is in all it’s original glory.

If you try it, please tell me - I’d love to hear how you’d describe it.

PB SWIRL BROWNIES

- 5 eggs, lightly whisked
- 3 tbsp olive oil
- 3 tbsp honey
- 1/3 cup of almond meal
- 1/3 cup of cacao powder
- 1/3 cup of plain wholemeal flour
- 50g of melted chocolate ( I used 50% dark)
- 2 tbsp of smooth natural peanut butter

1. Whisk together the wet ingredients excluding the chocolate.
2. Mix together the dry ingredients.
3. Add wet to dry and then stir in the melted chocolate.
4. Pour into an (approx) 30x15cm baking dish
5. Spoon dollops of peanut butter on top and swirl with a skewer

6. Bake at 160c (fan forced) for approx. 15 minutes or until a skewer comes out clean


How funny that the last blog I wrote almost 3 years ago was me being excited for the next year and how I was going to take more photos of people. I look at the date that was published and realise that a week later I found out I was pregnant.


PS. I do not want to move away from food photography, taking photos of people is hard. Food doesn’t move, is never self conscious and I can always pop a garnish on top to up the ante. People are fabulous, but definitely harder!

Nat x

'MINESTRA'

I love Minestrone.  When I was a child, I am told I would eat two big bowls of it (while my little brother had to be distracted by playing with boats in a water tub because he hated all things except peanut butter sandwiches without crusts and mashed potato).  As an adult?  I do the same.

Everyone has their own minestrone recipe, and truthfully, I never do the same thing twice and believe Minestrone can be made out of the vegetables that haven't been used yet at the end of the week (I endorse this fully, less waste!), but this recipe is my ideal situation and my perfect mix.

The only 100% necessary constant for me?  Pumpkin.  And the soup MUST be cooked until the pumpkin has disintegrated to make it thick and decadent.

Yes, vegetables in soup is decadent to me.  

So here it is - my Minestrone, or, as Nonna calls it, 'Minestra'

(stay tuned for the behind the scenes snaps & styling tips at the bottom).

NATALIE ZEE MINESTRONE SOUP RECIPE

The best part about Minestrone?  

It's all chop-chop-chop and throw in a pot.

BLOG MINESTRONE NATALIE ZEE RECIPE

NATALIE'S MINESTRA

You will need;
- 1/2 a medium sized pumpkin, chopped into small-ish cubes
- 1 large white potato, diced larger than the pumpkin
- 2 sticks of celery, sliced
- 1/4 of a cabbage, shredded roughly (with a knife will do)
- 1 head of broccoli, chopped roughly (including stem)
- 2 garlic cloves, peeled and roughly chopped
- 1 can of the best quality crushed tomatoes you can get
- About 150gms of pasta of your choice (my choice?  Always thin spaghetti).
- 1 can of cooked chickpeas, rinsed and drained
- Fresh herbs (oregano or basil) or dried oregano.
- Parmesan cheese, and the rind if possible (or this is a great time to use that left over rind).

To make it;
1. Pop all of the ingredients except for the chickpeas and pasta in a pot and top with water.  Include your parmesan rind too, if you have one.

2.  Bring to the boil and then simmer - most likely for about 90 minutes, or until the pumpkin is mushy (important!).

3.  Add the chickpeas and pasta (and a little extra water, if needed, as the pasta will absorb a lot), and cook until the pasta is al dente (or, 'all dental', if my spell check is to be trusted).

4.  To serve, season to taste and top with even more parmesan cheese, grated on top.

(My Nonna likes to make it with a fresh chilli inside so the heat works through the soup, which is delicious, but the chillies I have at the moment are too hot for it!)
 

BLOG MINESTRONE NATALIE ZEE RECIPE

I thought it would also be fun to start sharing a few behind the scenes snaps (just from my phone, nothing fancy), with each post.  So, see below (and you're always welcome to ask me questions via Insta DM or email - natalie@nataliezee.com, and I'll do my best to answer them in future posts).

MINESTRONE-BEHIND-THE-SCENES-NATALIE-ZEE.jpg

And finally, as I'm not into eating cold food, and therefore super passionate about photographing food the day after (as this was), my top tip for photographing soup the day after without having to heat it?

Mix extra water through it to get it's warmed consistency before you put it in the bowls, and once it's in the bowl, spray the top with water if anything looks a bit dry.

(I'll be sharing more tips on my newsletter over coming months - if you'd like to be included, head here).

Don't forget to tag me (@natalie.zee) or email me if you give this recipe a try, I'd love to see it & share it on my stories!

And what were the three ingredients not pictured?  Canned tomatoes, cheese rind & chickpeas!

Thanks for reading,

Nat x
 

15 MINUTE RAVIOLI / M'S WORK LUNCH

This recipe?  SO simple, that I'm not even sure it's worth posting (well, I wasn't, but here I am).  

But then you, online and offline, told me that you would never have thought of it and it WAS worth sharing, kind of like my 3-ingredient satay hack (which I will also share soon).

So here I am, back and blogging, in more of a personal style rather than a 'May put in recipe book one day' style, and I like it because I love writing and sharing and I genuinely LOVE what I do.  So in a world of 'wtf is going on with insta?', I am focusing my energy elsewhere.

Including my mailing list which will start up again this month (and you can subscribe to here).

For now?  M's lunch from this week - super, duper, simple ravioli.


The beautiful bowl?  Clay Bee Hive

The beautiful bowl?  Clay Bee Hive

TO MAKE THIS RAVIOLI...

You need;
- a 500g packet of your favourite ravioli (these are beef, because M rarely gets meat at home!)
- 1 cup of good-quality flavoured passata (I used Mutti 'Simply Sugo' Basil & Onion)
- 2 zucchini, roughly chopped (or peas, or any other vegetable!)
- A handful of torn fresh oregano or basil
- A handful of fresh spinach
- Parmesan or pecorino cheese (optional, but so highly recommended)

Then you simply;
- Boil the ravioli as per packet instructions, adding your zucchini/other vegetable half way through.
- Drain the pasta and put the passata/sugo in the pot with a splash of water.  Cook it for a minute or two.
- Add the pasta back into the pot with the spinach and fresh herbs and stir, on super low heat, for 1 minute or until the spinach has wilted.
- Pop into 4 containers and top with cheese.

That's it!

I love adding onion and garlic at home (just fry off on the pan quickly after the pasta is removed in a little olive oil then add everything back in), but the last thing M, or anyone else needs to do in an office, is eat garlic or onion.

NATALIE ZEE - RAVIOLI.jpg

And as for it not being a high-protein low-carb power lunch with quinoa and chia seeds and sweet potato only?  Well, we like pasta (and a big part of the reason I changed my name from 'Healthy Natty' is because some people thought, as a 'healthy' person, I shouldn't?).

Thanks for reading!  & be sure to share it on Insta (tag/message/send off a flare so I don't miss it and can share it!) if you give it a go.

I'll be sharing my Minestrone recipe next week, so I'd be super-honoured if you stay tuned.

Chat then,
Nat x